
FLOOR PLAN DESIGN TRICKS FOR CONCEALING LESS THAN IDEAL SITUATIONS - FOYER DESIGN
Did you catch last week’s post where I shared design tips for long, narrow floor plans? I detailed ways to enhance and define space when working with floor plans that have challenging proportions.
For this week, I’m taking it a step further by passing on more spatial-problem solving tricks that can make all the difference in concealing less than ideal situations.
CITRUS POINT PROJECT - FOYER
To illustrate we’ll take a look at the foyer design at the Citrus Point Project, an Arizona new build. We’ll start by going over a few preliminary drawings with notes pointing out the situations that created the need for concealment. From there we’ll review the final floor plan and design drawings, with notes explaining the solutions to the dilemmas we were facing.
PRELIMINARY FOYER DESIGN
The clients from the Citrus Point Project wanted to downplay the stairs leading to the 2nd floor, at least as much as possible. They also wanted to be able to shut off the 2nd floor from the 1st floor, primarily for noise control. This required the architect to enclose the area at the top of the stairs, which not only created a tall wall in the foyer, but a bridge across the circulation portion where the ceiling drops down, to make room for the stairs above.To conceal the ceiling change and other challenges the limited vertical height caused wiith the stairs being above the foyer, the architect created a shallow, flat ceiling transition between the wall and a barreled arch portion of the ceiling for preliminary design purposes. It was always understood that once we got further along in the design process, I would then circle back while going from room to room, and space to space, and find ways to refine what was currently there.
DESIGN CHALLENGES AND SOLUTIONS
Below I’ve shared a few screenshots from the architect’s virtual walk-through showing three challenging areas that with some finessing we were able to refine. *Be sure to keep scrolling to see more about each of the challenges and how they were solved.
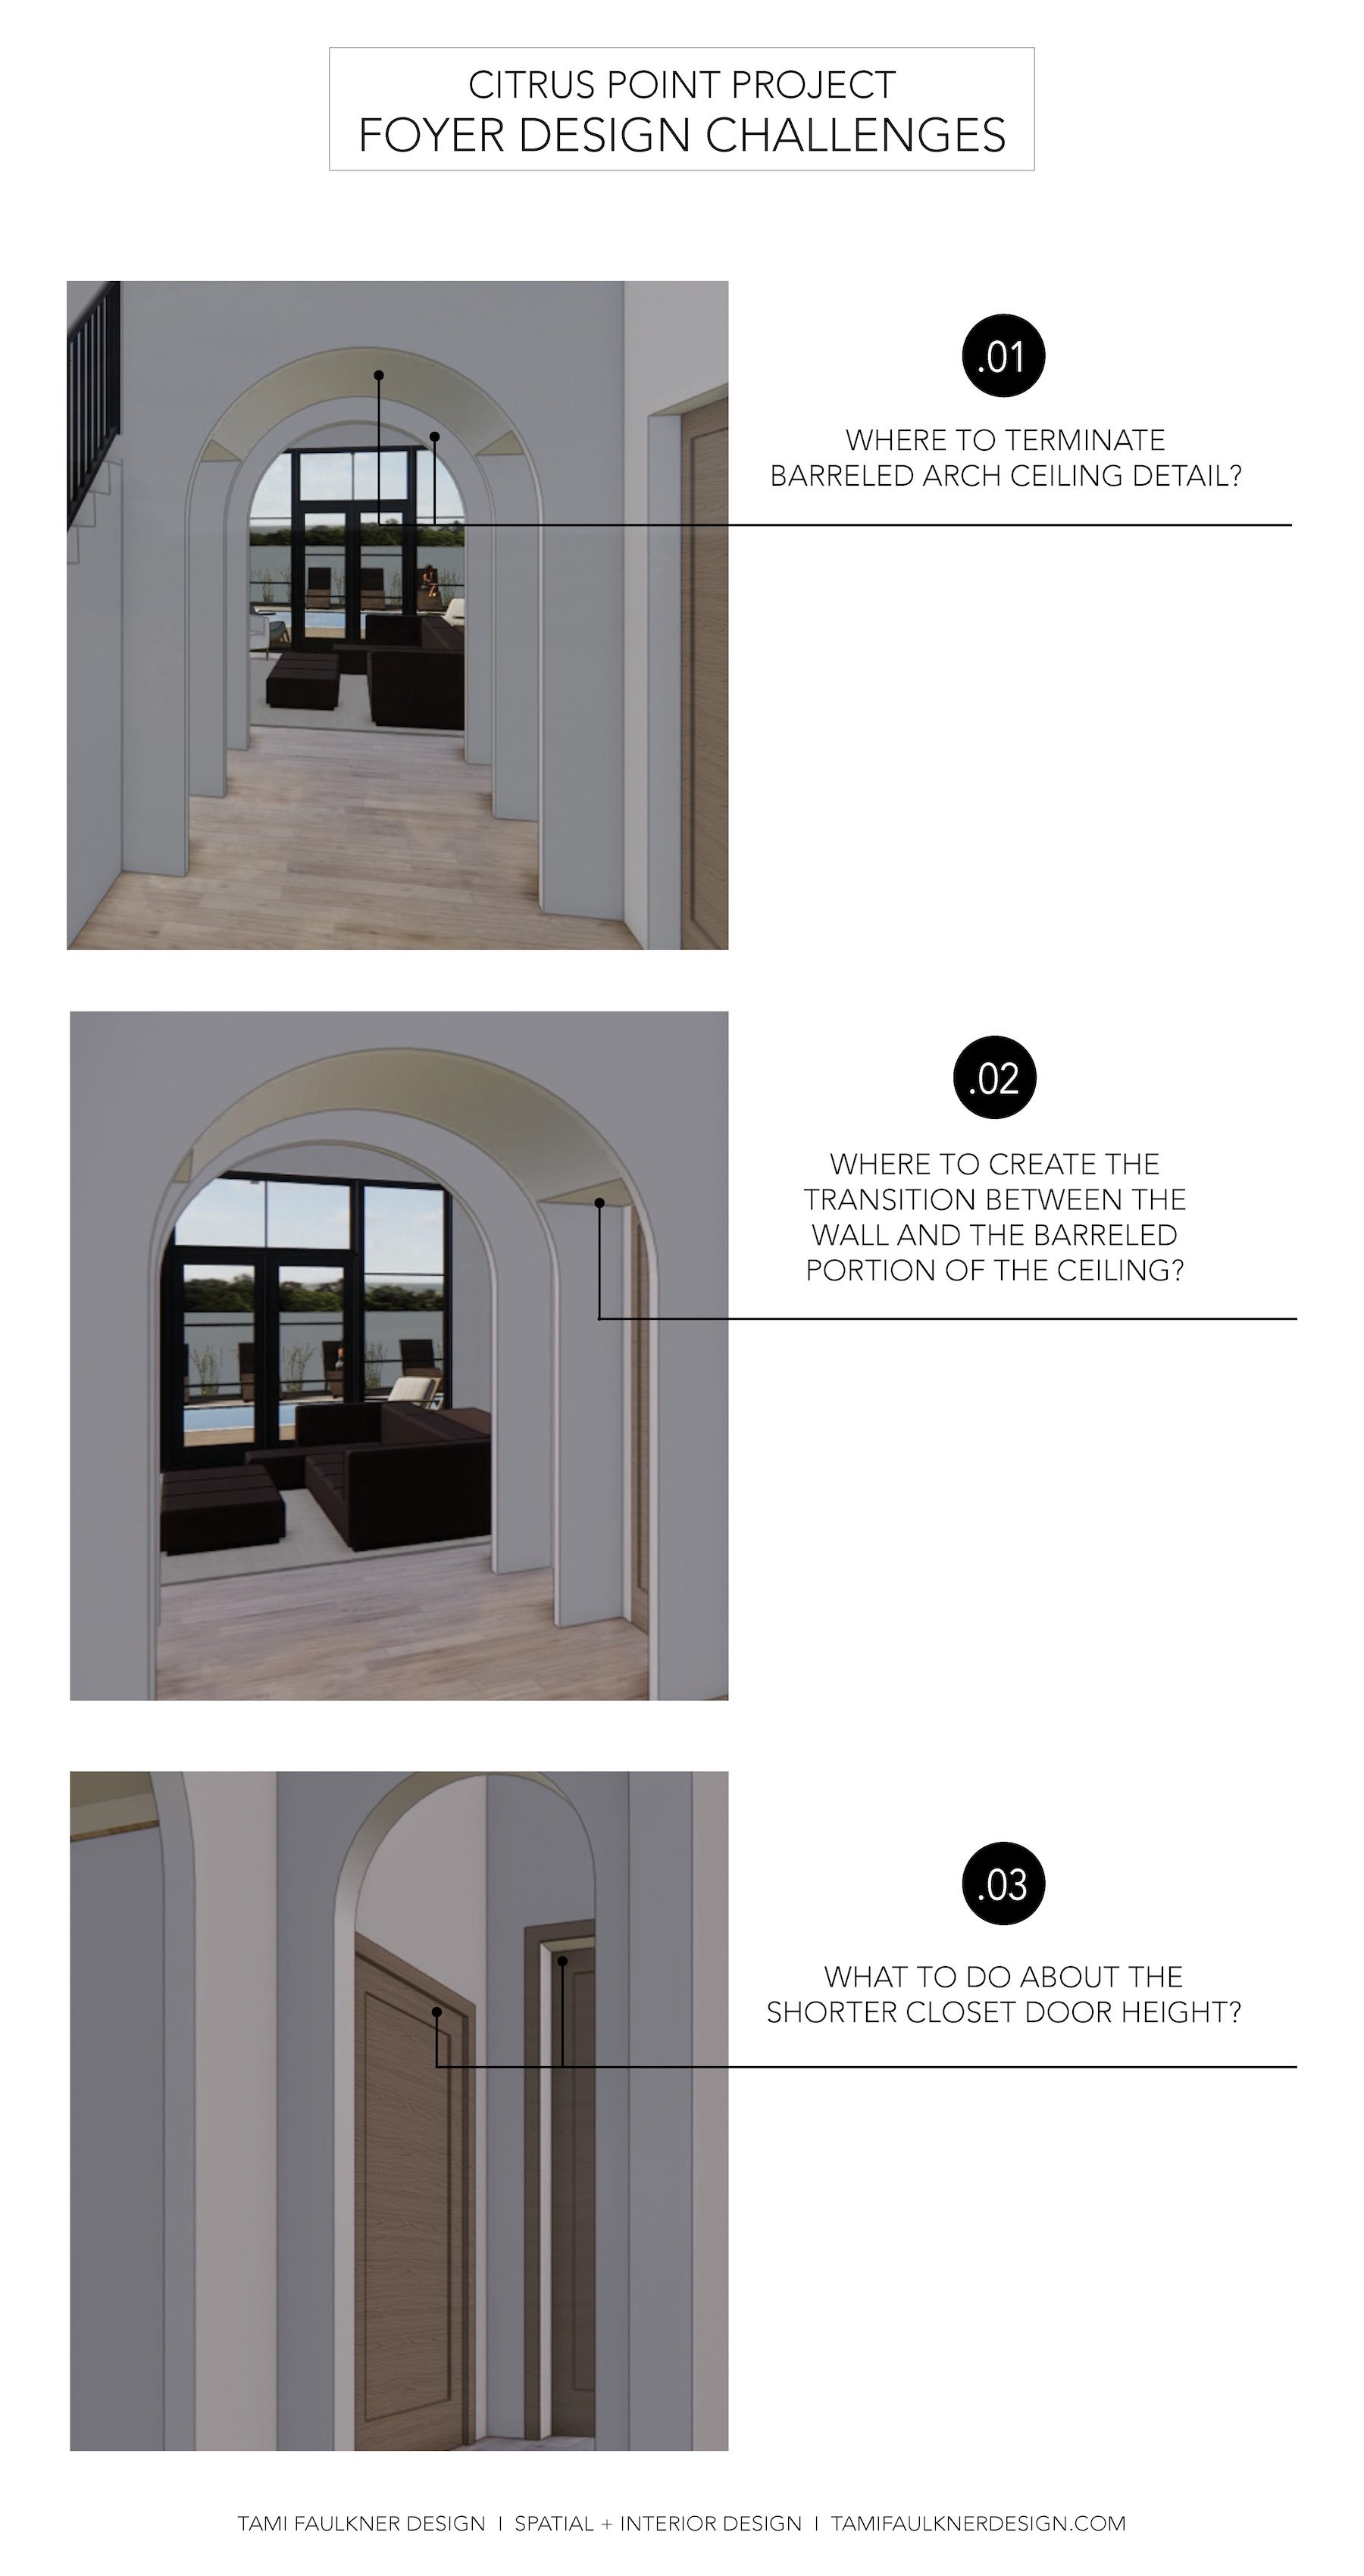

.01
CHALLENGE
Where to terminate the barreled arch portion of the foyer - as shown in the preliminary drawings? Or extend the barrel so it terminates at the end of the foyer?
SOLUTION
This was an easy decision. Extending the barrel all the way through to the end of the foyer would assure a more refined and intentional outcome.
.02
CHALLENGE
Where to create the transition between the wall and the barreled portion of the ceiling? Should it remain as shown in the preliminary drawings, with having a shallow section of ceiling transitioning from the wall at a 90 degrees and then start the arch? If so, the flat portion of the ceiling would be just enough to clear the stairs above and from there have height for the barreled arch. Or, could there be a way to eliminate the flat portion of the ceiling entirely since we wouldn’t be able to continue it to the end of the foyer given that it would interfere with the vestibule leading into the primary suite?
SOLUTION
After discussing with the client, together, we decided the best thing to do to clean up all the architectural transitions and to refine the space was to move the foyer walls inward so they are directly lined up with the lowest portion of the ceiling that was created by the stairs above. This meant that the foyer hallway would get less wide and the flat portion of the ceiling would no longer be needed.
.03
CHALLENGE
Originally the closet door to the storage underneath the stairs was placed adjacent to the primary bedroom door. Once again, the restricted height caused by the stairs located directly above, created yet another challenge. The limited available height would force the closet door to be only 6’-8” high, rather than the 8’-0” which would make it the only short door throughout the rest of the house. And to make the situation more challenging, given its location which is immediately adjacent to the primary suite door would have amplified the imperfections.
SOLUTION
As it often is the case with spatial problem solving, nothing happens in isolation. Even a simple change can cause a rippling affect that requires the designer to follow any chain reactions and modify and perfect any affected areas. Though it took some finessing to establish alignment through the design of the barreled arch portion of the foyer, that in and of itself ended up being a relatively easy solution. But it didn't stop there - the changes, like is often the case, had their own consequences to resolve. Here’s what I did to remedy all the intricacies that were interfering with the solving the challenges . . .
I relocated the closet door to the foyer instead of having it be in the primary suite vestibule. Even-though this change still didn’t allow for the door height to be raised to 8’-0” high, it did create a situation that allowed me to conceal the shorter door height by creating a facade, with making the closet door look like cabinetry. As designed the arched upper portion of the cabinet will be fixed, and only the lower, 6’-8” portion will open. Notice that I repeated the same cabinet facade design for the cleaning closet door on the opposite side of the hall. From there I matched the arched door way leading into the primary vestibule with an art niche on the opposite side of the hallway.
Now for the more complicated part…the highest point of the arched details for the doors and art niche, actually intersect the barreled ceiling arch. The solution was to change the barreled ceiling arch to a groin arches, very similar to the concept image below. As an important side note, while working on the modifications to the ceiling design, I consulted with the architect to get his expert advise and direction.

CONCEPT PHOTO


MORE VIEWS
Here’s a few cut-a-way perspective views of the foyer design depicting the closet doors that look like cabinets, the deep, arched entrance leading into the primary vestibule, the art niche and the groin arches.


BEHIND THE SCENES - DESIGN PROCESS
If you’re like me and love to see the process behind creative work, here are a couple of overlay sketches that I did while designing and problem-solving the foyer design. Once I complete the design work, I pass my drawings on to a design assistant who then prepares them in AutoCAD and SketchUp (like are shown above).


SEE MORE ABOUT THIS PROJECT
DESIGN TIPS FOR LONG AND NARROW FLOOR PLANS - PRIMARY SUITE DESIGN
HOW TO MAKE FLOOR PLANS MORE INTERESTING - STUDY DESIGN
CREATING INTENTIONAL SPACE THROUGH WELL DESIGNED FLOOR PLANS
PRIMARY BEDROOM FIREPLACE AND TV WALL - DESIGN CHALLENGES + SOLUTIONS
PERFECTING A PRIMARY SUITE FLOOR PLAN - SMALL CHANGES WITH BIG REWARDS
POOL BATHROOM DESIGN - BEFORE + AFTER FLOOR PLANS
DESIGN TIPS FOR SMALL BATHROOMS AND THE IMPORTANCE OF INTERIOR ELEVATIONS
CHOOSING A DESIGN AND BUILD TEAM FOR YOUR CUSTOM HOME
PRIMARY SUITE DESIGN - CITRUS POINT PROJECT - MESA, ARIZONA
INTERIOR DESIGN STUDIO - A WEEK IN REVIEW - 23 JANUARY 2022
INTERIOR DESIGN STUDIO - A WEEK IN REVIEW - 25 JULY 2021
THE TAKE AWAY
Back in the day, standard door heights were 6’-8” but not any more. In today’s custom, and in most production build homes, standard door height is now 8’-0”.
I often talk about how spatial design challenges force creativity and create opportunity to design unexpected, interesting spaces. This is a good example of that very thing! All the problem solving solutions will actually elevate and beautify the space.
As was mentioned above when it comes to spatial problem-solving, nothing happens in isolation. Be sure to include a skilled and educated designer who specializes in spatial design and interior architecture for your custom home project.. They will be worth the investment!
TF DESIGN
GOOD FIT?
Due to my comprehensive approach to design I invest a lot of time, energy, and even a lot of love into each of my projects. If you are hoping to work together, and think that TF Design would be a good fit for your new build project or whole house remodel (full service only - starting with the floor plan phase and working all the way through to the completion of construction), reach out via the contact page on my website, and answer all the questions as thoroughly as you can. Once received, I’ll review and get back with you.
FLOOR PLAN REVIEW + CONSULTATIONS
Don’t need full service design but you have a new custom home project in the works where you are feeling unsure about the floor plan? You can get expert spatial guidance and direction with your your floor plan through the Floor Plan Review and Consultation. I’ll redline your floor plans and then provide potential solutions. This service is intended for those needing an extra layer of expertise with their floor plans before they are finalized.
““We booked a floor plan review with Tami because we wanted and needed a new perspective on our plans. I had gained some spatial design tips from reading Tami's design blog, but those helpful tips were no substitute for having her review and redline our floor plan herself. Tami came to the meeting well-prepared and organized. She not only highlighted the problem areas in our design but offered helpful suggestions to fix those issues. During our time together she taught us about good design elements and provided tools for us to work on our design after the meeting. We now have a better perspective on our floor plan and new ideas to implement, thanks to our session with Tami.” - Jennifer, MASSACHUSETTS
DESIGN CONSULTATIONS
Don’t need a floor plan review exactly, but you’re feeling stuck in uncertainty and are looking for guidance with design questions specific to your project but don’t know where to go? I’m here for you.
With more than 22 years experience as a custom home designer, I can help guide you through the design dilemmas that you are facing through my new 60 minute virtual design consultations. During our time together I will answer your questions, provide solutions, all while explaining the reasoning behind them. That way you have a better understanding of the why’s and why-nots of good design and can move forward with confidence.